
You are currently browsing the monthly archive for October 2007.
Here is where I stand at day four:
Finish brooches- Coffee cozies (cut fronts, sew, and sew buttons to close)
- Crocheted flower brooches(
starchand sew on buttons/pinbacks) - Journals
- Totes (May not make them as I am working on another item)
Button push pins
Here are pictures of the WIPs.
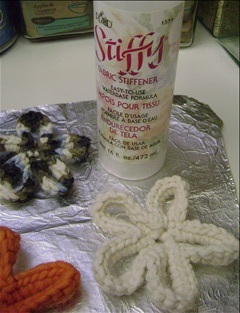

Stiffy helps to hold the shape of the flowers which are not all white and orange, but various fall colors and neutrals. They are sitting on aluminum foil and I like the foil as I can wipe up the drips easily and also reuse it after wiping it down. I flip the flowers several times through the drying process. This avoids the little puddles that sometimes attach to them in certain places. Also, I can use the front or the back of the flower as the mood hits me.
I also cut out the felt inside of the coffee cozies, 30 in all. Felt linings help to absorb the heat. It also makes the cozies a bit thicker. Anyone who has burnt their fingers holding a cup of hot coffee/tea can appreciate this extra heft.

Later today I will cut the fronts and start making the journals. I took a side trip and worked on the buttonhole sewing yesterday. I may bag the totes (no pun intended) and go with this other item if I get a bit better. I made 7 yesterday and I really like them. They meet my favorite craft criteria: fun, funky, and I would buy a bunch. I will post pics tomorrow as I get better with them.
Here is a recipe that I made yesterday to treat myself for working so hard. It is from Real Simple, so you know it is both quick and easy. I love this magazine and get a lot of great ideas from it with every issue.
Roasted Apple and Walnut Tarts ![]()
1 8-ounce sheet frozen puff pastry, thawed
1 Cortland, McIntosh, or Empire apple, cored and cut into 1/2-inch pieces
1/4 cup dark brown sugar
1/2 cup (about 2 ounces) walnuts, chopped
Whipped cream (optional)
Heat oven to 400° F. Cut the puff pastry into 4 squares. Line 4 rounds of a muffin tin with the squares, allowing the corners to stick out.
In a small bowl, combine the apple, sugar, and walnuts. Fill each pastry square with some of the mixture and bake until the crusts are golden brown, about 25 minutes. Let cool 10 minutes before removing from the tin.
Place one tart on each plate. Serve with the whipped cream, if desired.
Yield: Makes 4 servings
NUTRITION PER SERVING
CALORIES 382(57% from fat); FAT 24g (sat 10g); SUGAR 19g; PROTEIN 2g; CHOLESTEROL 40mg; SODIUM 212mg; FIBER 2g; CARBOHYDRATE 42g
I used a Granny Smith apple as that is all that I had and added a quarter cup of craisins to the above. I didn’t have whipped cream, but it was still YUM-UM-UMMY!
And to all of my blog readers….

Happy Halloween!
Well, I can cross another “to do” off of my list.
Finish brooches- Coffee cozies
- Crocheted flower brooches(starch and sew on buttons/pinbacks)
- Journals
- Totes
Button push pins
Here are the fruits of my labor yesterday. I covered buttons and used vintage covered/uncovered buttons to complete these. They are the perfect $1 item and great for kiddies looking to spend a buck burning in their pockets.


In case you are wondering, yes I individually glued each and every button to the pushpin.

I use a bulletin board to work on and cover it with Glad cling wrap to keep the glue off the board and it makes those buttons where the glue comes through the holes easily come off the board, too. E6000 glue is my glue of choice. The vintage fabric buttons had to have the shank cut off first. I got the forms for the smaller buttons that I covered without the shanks from JCaroline Creative. You can find them here. They are available in various sizes, too. The one that I linked fits perfectly with the pushpins as they fit exactly inside them.
You can also use the longer clear pushpins to make them, too. Those are perfect for affixing to a shelf and hanging necklaces, using for a decoration, holiday stocking or a favorite picture. They also look great on your bulletin board with that special button that you cannot part with. And bonus, too, they are great for a friend that sews for a last minute gift. You can use a set of 6 buttons.
I learned something as I was making the covered buttons, if you have some fabric hanging out you can pull it all out and the button cover opens up so you can reuse it. You can see the small ones that I covered better in the last picture above with the large purple one.
Now, on to the starching of the crocheted flowers. I am also toying with trying a new item. I have to play a bit with making a buttonhole first in order to do it. This evening I will cut out the fabric and felt for the cup cozies.
Hope your week is progressing well!
Well, the list is doing the trick. I am hopeful that by the weekend I can give myself a treat for a job well done and completed.
Here is another work in progress, the crocheted flower brooches. I crocheted all of the flowers last night (30). This afternoon will be spent starching them. I starch them so they keep that flower shape and you can see the vintage button I will add to the middle without a floppy petal in the way.
Here they are all in a pile.

This morning I cut the circles for the button pushpins. I am making some with non-covered buttons and some with the covered buttons. I will post that one when it is a bit farther along.
Here is my progress:
Finish brooches- Coffee cozies
- Crocheted flower brooches(starch and sew on buttons/pinbacks)
- Journals
- Totes
- Button push pins (make covered buttons and glue to pushpins)
Ah, progress!
Hope your week started well!
Sometimes I get dates “remembered” in my mind that are not quite “the date.” Let me explain…I make a commitment to do something and then fix the target date in my head. I think each day…week out….two weeks out…5 days out…etc.
I am prepping for a craft show on November 4th. It is my first show. I have been thinking that I was 2 weeks out. I looked at my calendar yesterday and realized that as of today I am ONE week out! OMG, the panic set in. You can tell I am panicked as I sat down and made a list of the projects I need to start/finish/complete. I only do lists when I need to focus and knuckle down. I try to happily live my life “on the fly.”
So a list is serious! A list is a commitment. It is a contract. You set goals, you write words, you place check marks or line through them when they are done. As I wrote it yesterday, the panic hit. HOW COULD I POSSIBLY GET ALL THAT DONE?? Then I took a few breaths into a paper bag, calmed myself and set about the plan.
Here is the list:
Finish brooches- Coffee cozies
- Crocheted flower brooches
- Journals
- Totes
- Button push pins
Notice that one of the items is lined through. I finished them last night as I watched TV. The felty brooches have been completed, all 50 of them! There are teacups, stars, angels, oak leaves, and trees. I believe the stars are my favorite. I used metallic gold floss to outline them. Let me tell you though, what a pain in the @## to use! It tangles, it knots, it catches…argh!!!!!!!!! I bought some silver and pink metallic floss also and it might just stay unused. I have to admit that the hassle was worth it on the stars.

Now to my plan. I will make one to do list item per day. Not a single item, but a quantity of them. I should be right on track and still meet some commitments that I have made to some of my friends-dinner and a movie with Brenda on Friday evening and help to pack and wrap so that my friend, James, can paint in the Market is Your Canvas competition during the Brunswick Stew Festival. I have not been to the Brunswick stew festival and it sounds like a lot of fun. If you are in Richmond, you might want to check it out on the 3rd.
My Sweet Goodness Swap sister, Christy, has posted about the goodies I sent her. You can also check out the flickr page to see the other amazing items that the Swap Sisters made. Here is the link to the Pumpkin Gingerbread Trifle recipe Christy mentions in the post. It is super easy as it uses boxed Gingerbread cake mix and it is a Paula Deen recipe, so you know it is YUMMY!
Lastly, I ate the most glorious soup yesterday! I had to go to the Lakeside area of Richmond to check on some items at a new shop to see how they are doing. At times I have lunch at the Garden Cafe at Lewis Ginter. It is not your usual fare of cafe items.
I wanted some soup and they had a Butternut Squash Soup. Normally, it would not be my choice, but I am trying to be more adventurous with my eating. OMG, it was the best thing I have ever eaten. It was soup, but it was sweet and warm and glorious. It was like eating a pureed pumpkin pie! Not nearly that sweet, but as great.
I searched my trusty All Recipes and found a recipe that I believe has all the flavors I tasted and is easier to make (I am not one for complicated cooking). In case you want to try it, too here is the recipe.
Creamy Butternut Squash With Cinnamon Soup
SUBMITTED BY: USA WEEKEND columnist Pam Anderson
INGREDIENTS
- 2 tablespoons olive oil
- 1 1/2 pounds peeled and seeded butternut squash , cut into 1-inch chunks
- 1 large onion, cut into large dice
- 1 tablespoon butter
- 1 pinch sugar
- 3 large garlic cloves, thickly sliced
- 1 1/2 teaspoons cinnamon
- 1 teaspoon ground ginger
- 1/4 teaspoon ground cloves
- 1/8 teaspoon cayenne pepper
- 3 cups chicken broth, homemade or from a carton or can
- 1 1/2 cups half-and-half (or whole milk)
- Salt and freshly ground pepper, to taste
- Garnish: store-bought apple chips
DIRECTIONS
- Heat oil over medium-high heat in a large, deep saute pan until shimmering.
- Add butternut squash, then onion; saute, stirring very little at first, then more frequently, until squash start to turn golden brown, 7 to 8 minutes.
- Reduce heat to low and add butter, sugar and garlic; continue cooking until all vegetables are a rich spotty caramel color, about 10 minutes longer.
- Add cinnamon, ginger, cloves, and cayenne pepper; continue to saute until fragrant, 30 seconds to 1 minute longer.
- Add broth; bring to a simmer over medium-high heat. Reduce heat to low and simmer, partially covered, until squash is tender, about 10 minutes.
- Using an immersion blender or traditional blender, puree until very smooth, 30 seconds to 1 minute. (If using a traditional blender, vent it either by removing the lid’s pop-out center or by lifting one edge of the lid. Drape the blender canister with a kitchen towel. To ‘clean’ the canister, pour in a little half-and-half, blend briefly, then add to the soup.)
- Return to pan (or a soup pot); add enough half-and-half so the mixture is souplike, yet thick enough to float garnish. Taste, and add salt and pepper if needed. Heat through, ladle into bowls, garnish and serve.
This recipe was originally featured in the USA WEEKEND article One Formula Makes 10 Full-flavored Vegetable Soups on October 24, 2004.
One more item for the list:
7. Buy Butternut Squash!
Hope your weekend is going well!
Still busy working on the craft show prep. I hope you enjoyed the Halloween themed clip!
As we say in the south…”well, bless her heart!”
I love the various parts of the creative process and how a thought comes to fruition. Sometimes I start with the items and see where the process takes me. Then I take the result and place it somewhere I pass many times a day as I decide if I REALLY like it. To wonder if others will REALLY like it. Kind of like sticking my toe in the water to test it. That is sometimes how my creative process works.
I get inspired by pictures, the colors, great fabric print, other designs, and the work of my bloggy friends and other crafters. Gladly, I will try anything once. If I do not enjoy the process it will be the last even if others like it. Such is the world of my craft. The items I make are all items I like and would use. I try to price them reasonably and at a price that I would pay for them. At times, people say that I don’t charge enough. There are also times that we tweak the price as we go to move it a bit. I also listen to the feedback from the people that buy them. Both of the shops I sell at are good about sharing that feedback.
Which leads me to my latest WIP. I made these 4 brooches and really like the leaf shaped one with the leaf and the apple shaped one. The Hello Kitty was just something fun and a bit more over the top then I normally go. The other is a scene from a piece of vintage barkcloth that I thrifted. What do you think? Do you like them? Ideas to tweak them or make them better?

If you have not figured it out by now, I LOVE BROOCHES! I have lots and lots of them and rarely have a jacket that I wear that doesn’t have one pinned to it. I have vintage ones, sparkly ones, crafty ones, crocheted ones, sterling ones and on and on and on and on. I am like a moth to the flame with them and they seem to have a gravitational pull to draw me to them. Do you have anything that you cannot walk passed without buying?
Here are some other WIPS for the holiday season made from felted wool.
Stars…

Angels ( I apologize for the pic, I couldn’t get them to come out clear to save my soul!)…

I like somewhat non-traditional colors for the holidays. It also lets you stretch the life of the item passed the holiday season.
Now let’s get to my mailbox. Oh, the postman is liking me lately with the packages he is carrying for me!
The lovely Heidi sent me a pendant that I admired on her blog. She is a beginning solderer, but you cannot tell by this pendant. I am bowled over with the way she presented it to me. She put the dictionary page with the word Hope on it behind the pendant, placed a sweet black ribbon at the top and some gathered orange and black crepe ruffles (you have to take my word for the ruffles as in order to get a close up on the pendant I lost the ruffles in the pic).

If, after checking out her blog, you feel the urge to support a fellow crafter you can buy her items on Etsy here. I just love her newest sign inspired by her daughter and in the Thanksgiving spirit. Truthfully, is that not what we ALL do?
BrendaLea, the fabulous prpldy that I blogged about her flickr pages here, I met via swap-bot and she was the recipient of the second Dotee doll on this post. She sent me this Dotee that I received today just because. I love the petals around her face and the vintage fabric. It is in my fav shades of pink! Thanks, I LOVE HER!

She is a great lady and I am blown away by her handwork. Did you see this doll in her Flickr photos? OMG, that would never happen in my lifetime! I don’t have that much stick-to-it-iveness!
Lastly, here are some swap items that I sent recently.
This is my reciprocal for the pendants from Breanna. I also sent her the brooch at the end of the pendant post.

Look familiar? It is another version of this bag. I couldn’t find the cord to match as I would like so inserted some thrifted handles I had instead. I switched up the fabrics a bit, too.
Here is the collage I made for Christy for the Sweet Sister Swap. Like the hyperactive child I am I got so wrapped up in wrapping her pressies that I forgot to take a pic of it all (pun intended). She promised to blog about it soon. She has a 5 year old son and is heavily into school party prep and Halloween.

I used some vintage sheet music, some thrifted paper lace ribbon, some very stiff black felt, polka dot and Halloween ribbon, and Mod Podge. Note for next time I do this type of thing…matte podge makes it look like the fabric has white pills and satin podge makes them go away! :O) Satin podge was my last resort before the redo. It all worked out okay in the end.
The musical selection I cut up was called Nocturne, which I believe means night (correct?). How appropriate! Too funny that we both sent each other arched cats with crescent moons, huh?
Whew, that was a long one, huh! BTW, we got over 2″ of glorious ground drenching rain yesterday and it has been misting all day today and another large storm tomorrow and overnight is predicted. Never thought I would be excited about dark and dreary skies!
It is almost the weekend!!!!!!!!!!!!!!!!
Cats can be persistent!

We have been in the midst of a great drought here in central Virginia. Today we finally have some significant rain on its way. As I type I can hear the thunder off in the distance. Oh Glory, I might go play in the puddles! That is after the lighting and thunder stops.
Thanks God, for the lovely rain! We needed it as the plants and trees were so dry. Now go and wash away all the barren and make it all green again. Replenish the lakes and increase our water supplies. Thanks for the lovely rain drops.
Have to scoot as the lightning is really close now! EEK!
Christy, my Sweet Sister Swap partner sent me her package of Halloween goodness. She gave me a sneak peek at her project, but it was not as lovely as the finished item and only one small part! Check out the goodness she bestowed on me…

She made me one of her Morsbags in the appropriate color for the holiday, a cute decorated tin filled with my fav Reeses’ cups (most already gone), some cute Halloween buttons for projects, one (of two) Tootsie Pops that her son Nathan sent to me (he had them covered with white tissues and decorated as ghosts), and a handmade Halloween card with such a sweet picture and the glittery embellishments and buttons added.

Now that thing that was part of the sneak peek.

Here are each of the panels panel close up.


Thank you, Christy….I LOVE, LOVE, LOVE IT! I appreciate all of the handiwork you put into this and have placed it proudly on my front door for the holiday. Thanks to Nathan, also, for the most excellent ghost lollies! I loved them so much it was the first candy I ate!
I spent the last 2 days working on some smalls for the craft show on the 4th of November. I decided to play with my felted wool and create some small holiday brooches. These whipped up quickly and I had a lot of fun making them, too.

They are teacups, oak leaves and Christmas trees (or should it be holiday trees??). I used some templates I located using the google image finder for each of the objects and then used a simple blanket stitch to sew it on. I then sewed on the pin back.

Here’s hoping your week is filled with scary, but sweet surprises!


